Comma Separated Values (CSV) files are a popular plain text format for exporting and importing data because of their simplicity and wide compatibility. However, they lack strict standardization or a built-in mechanism for data validation, which can lead to errors and inconsistencies.
They can't store complex data types and relationships between data or enforce data integrity rules. That’s why product and development teams prefer relational databases such as MySQL to handle large relational datasets while maintaining data integrity.
Importing CSV files into MySQL is common for developers and businesses handling large datasets. However, this process is largely developer-centric. Non-technical users often find it challenging to handle data imports—especially when import requirements vary consistently with sourced data.
A solution is to build custom data import systems, regardless of how long it takes to implement. Iterating on a custom solution based on varying data requirements can also be cumbersome and require constant developer support.
This guide breaks down the steps to import a CSV file into a MySQL database, followed by a simplified, user-friendly approach using nuvo Importer. Let’s dive in.
Importing data from a CSV file into a MySQL database is a common practice for several reasons:
There are different ways of importing CSV files into MySQL, depending on the situation, feasibility, and desired user experience. Here are three common approaches:
LOAD DATA INFILE 'Path to the exported csv file'
INTO TABLE user_details
FIELDS TERMINATED BY ','
IGNORE 1 ROWS;

The wizard will also provide options to fill in additional details like the line separator, field separator, encoding, etc. Here, you need to ensure that the value of the encoding field in the wizard matches the encoding of the CSV file.
A common challenge with these methods is the inability to provide non-technical users with an optimized process for managing complex data import scenarios—and that’s not the only hurdle.
Some key challenges of importing CSV files into a MySQL database include:
These complexities make manual CSV imports time-consuming and error-prone—particularly for large datasets.
To handle data imports as accurately as possible, you will have to cover all these scenarios and edge cases. Building an optimized user interface for non-technical users to handle imports multiplies the error probability.
What would a more efficient, scalable, and precise CSV import solution look like?
Before getting into this tutorial, please make sure you have a basic understanding of the following tools and concepts:
Let’s get started by setting up a sample MySQL database.
If you’ve already set up a MySQL database, skip this step and create a backend server that interacts with the database.
Download and install the MySQL database on your system. For this guide, you can use the community edition, enterprise edition, or the cloud service for MySQL. Follow the instructions in the official documentation to install MySQL on your Windows, Mac, or Linux OS.
If you are using Ubuntu, you can install MySQL by typing this command in a terminal session; you can type the following in the command line even in Windows WSL:
$ sudo apt install mysql-serverTo check if MySQL is installed correctly, you can check its version using the following command:
$ mysql --version$ sudo systemctl status mysqlTo start running the MySQL service, type the following command in the terminal:
$ sudo systemctl start mysqlTo check which port is used by MySQL on Linux, you can use:
$ sudo netstat -tlpn | grep mysql$ sudo mysql_secure_installationThe installation will ask you to set the root user password and other configurations; you can choose the default options.
Now, create a new user for your database:
$ sudo mysql -u root -pYou will be asked for the MySQL root user password when you run the command. Then, you will be able to use MySQL commands.
To create a new user run the following statement:
> CREATE USER 'user'@'localhost' IDENTIFIED BY 'password';Replace ‘user’ with the username of your choice. ‘localhost’ is the host where you will create the user. In ‘password’ enter the password for this new user.
The newly created user has no privileges on any database, and you can't access the MySQL shell either. Therefore, the root user has to grant certain privileges to this new user.
There are several privileges, and their assignment will depend on the server administrator. Here, you can grant CREATE privilege to create new tables or databases.
> GRANT CREATE ON test.* TO 'user'@'localhost';If you want to grant all permissions on all tables in a single call for the test database, the best option is ALL PRIVILEGES:
> GRANT ALL PRIVILEGES ON test.* TO 'user'@'localhost';Now, you are ready to use your database. You can also use MySQL workbench to work with the database and tables.
Type the following command to list all existing databases:
> SHOW DATABASES;Before you can start working with the database, create and use the database:
> CREATE DATABASE [database_name];
> USE [database_name];
Now, you can create the database table. The basic MySQL syntax to create a table is the following:
> CREATE TABLE [table_name] (column1_name data_type(length)
[NOT NULL] [DEFAULT value] [AUTO_INCREMENT], column2_name data_type(length)
[NOT NULL] [DEFAULT value] [AUTO_INCREMENT] ... );
Alternatively, if you want to import an SQL file, you can do so in the terminal:
$ sudo mysql -u username -p [database] < [sql_file_path]To follow through the tutorial, you can download a sample database and import it into a database. Here’s a sample database you can work with. To load the data into the MySQL server, you can run:
> source c:/temp/mysqlsampledatabase.sqlRemember to specify your data path. The example above used ours.
show databases;You can create a backend server using Node.js, Express, or any other language. Here, we will use Flask, a lightweight Python web framework, to create a backend server that handles database operations.
Start with installing the necessary Python packages in your project:
pip install flask flask-cors mysql-connector-python
from flask import Flask, request, jsonify
from flask_cors import CORS
import mysql.connector

app = Flask(__name__)
CORS(app)

# Establish a connection to the database, use the credentials you have selected
db = mysql.connector.connect(
    host="localhost",
    user="root",
    password="password",
    database="mydatabase"
)

@app.route('/users', methods=['POST'])
def add_user():
    data = request.get_json()
    cursor = db.cursor()
    # Define the SQL query with placeholders
    query = """ INSERT INTO customers ( customerNumber, customerName, contactLastName, contactFirstName, phone, addressLine1, addressLine2, city, state, postalCode, country, salesRepEmployeeNumber, creditLimit ) VALUES (%s, %s, %s, %s, %s, %s, %s, %s, %s, %s, %s, %s, %s) """

   # Convert the array of dictionaries to a list of tuples
values = [(d["customerNumber"], d["customerName"], d["contactLastName"], d["contactFirstName"], d["phone"], d["addressLine1"], d["addressLine2"], d["city"], d["state"], d["postalCode"], d["country"], d["salesRepEmployeeNumber"], d["creditLimit"]) for d in data]
    # Execute the query for each set of data
    cursor.executemany(query, values)

    db.commit()
    cursor.close()
    return jsonify({"message": "User added successfully"}), 201

if __name__ == '__main__':
    app.run(port=5000)
@app.route('/users', methods=['GET'])
def get_customers():
    cursor = db.cursor(dictionary=True)
    cursor.execute("SELECT * FROM customers")
    results = cursor.fetchall()
    cursor.close()
    return results
You can run this backend server that listens to port 5000 for post requests by running this Python command (against the file):
$ python ./app.pySign up on nuvo’s user platform and get your license key.

Set up a target data model for the target table of your MySQL Database. Click on New Model.

Create a Target Data Model (TDM) by choosing a name.

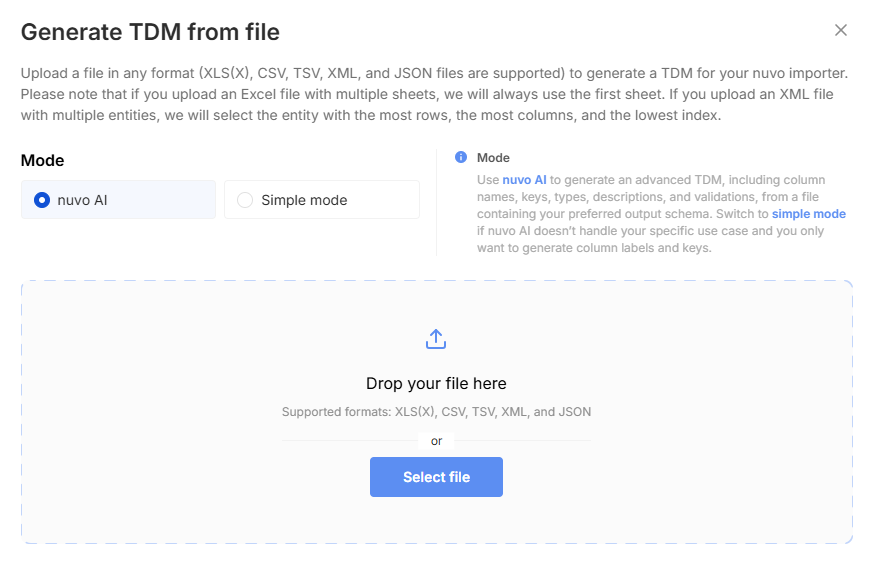
Use Simple mode or nuvo AI to generate a TDM from a file.
Below is a sample CSV data you can use with the above database. You can manually introduce additional issues on this CSV file, such as encoding issues, adding more columns removing certain columns, or creating phone number validation issues to test nuvo importer data cleaning and validation capability. The data already has some issues, which will be highlighted by nuvo once you import it.
Save the above data into a CSV file and drop it into the TDM dropdown. This will automatically identify the header and map it to the target data model. You can define the Target data model in the UI or in the code. Additionally, you can apply required, unique, and regex validations, as well as specify the column type (e.g., float, int, date, currency, etc.). Many of these data types already have certain validation logic, reducing our data cleaning effort.

Now that you have a TDM defined, you can set up your frontend. You can choose from React, Angular, Vue.js, JavaScript, and Next.js. In the nuvo dashboard, navigate to the Setup SDK tab and follow the setup instructions listed. Here, we will use React.js.

Copy the license key and select the TDM you created.

Nuvo provides a pre-configured NuvoImporter component in Step 4 of the setup instructions. We will use that shortly.

You can run the page in the sandbox or download the dev box to run it locally.
Since React is a frontend library, it will interact with the MySQL database on the Python backend server. Now, you need to send the data from the frontend to your backend server. This article will use Axios to make HTTP requests from the React App.
Update the onResults prop calls the handleResults function which sends the data to your Flask backend using Axios. Install it in your project with:
npm install axios
// or
yarn add axios
Update the app to handle the importer. Also, remember to update the nuvo license key and the backend URL to match yours.
import React from "react";
import "./styles.css";
import { NuvoImporter } from "nuvo-react";
import axios from "axios";
function App() {
  const handleResults = (result: any, errors: any, complete: any) => {
    // Send data to the Flask backend
    axios.post("http://localhost:5000/add_users", result)
      .then(response => { console.log("Data sent successfully:", response.data); complete();})
      .catch(error => { console.error("There was an error sending the data:", error);});
  };
  return (
    <div className="App">
      <div style={{ margin: 20 }}>
        <img src={"./Logo.png"} className="App-logo" alt="logo" />
        <h1>nuvo Importer Demo</h1>
      </div>
      <div className="container-wrapper">
      <NuvoImporter
  licenseKey="insert your license key here"
  settings={{
    developerMode: true,
    identifier: "product_data",
    columns: ....
  }}
  onResults={handleResults}
  />
      </div>
    </div>
  );
}
export default App;
The column section consists of the Target Data Model, which is the schema for the target table provided on the setup page. You can additionally apply required, unique, and regex validations. Furthermore, you can add your own data transformation formulas to adjust the input data to match your expected
output structure, this is particularly useful for data cleaning, styling, and white labeling. Here’s what you will use:
columns:[
  {
    "key": "counterparty",
    "label": "Counterparty",
    "description": "",
    "columnType": "string",
    "validations": [{ validate: "unique" }],
  },
  {
    "key": "iban_nr",
    "label": "IBAN Nr",
    "description": "",
    "columnType": "iban",
    "validations": [{ validate: "required" }],
  },
  {
    "key": "type_of_payment",
    "label": "Type of payment",
    "description": "",
    "columnType": "string"
  },
  {
    "key": "purpose",
    "label": "Purpose",
    "description": "",
    "columnType": "string"
  },
  {
    "key": "amount",
    "label": "Amount",
    "description": "",
    "columnType": "float"
  },
  {
    "key": "currency",
    "label": "Currency",
    "description": "",
    "columnType": "currency_code",
    "isMultiSelect": false
  },
  {
    "key": "transaction_date",
    "label": "Transaction date",
    "description": "",
    "columnType": "date"
  },
  {
    "key": "verified_date",
    "label": "Verified date",
    "description": "",
    "columnType": "date"
  },
  {
    "key": "first_name",
    "label": "First name",
    "description": "",
    "columnType": "string"
  },
  {
    "key": "last_name",
    "label": "Last name",
    "description": "",
    "columnType": "string"
  },
  {
    "key": "merchant",
    "label": "Merchant",
    "description": "",
    "columnType": "string"
  },
  {
    "key": "merchant_category_code",
    "label": "Merchant category code",
    "description": "",
    "columnType": "int"
  },
  {
    "key": "currency_exchange_rate",
    "label": "Currency exchange rate",
    "description": "",
    "columnType": "float"
  },
  {
    "key": "town",
    "label": "Town",
    "description": "",
    "columnType": "string"
  },
  {
    "key": "country",
    "label": "Country",
    "description": "",
    "columnType": "country_code_alpha_2",
    "isMultiSelect": false
  }
]Your system is now ready to be tested. Assuming you used npm as a package manager, you can start a development server for your react app using this command:
npm run dev // starts a dev server.
npm start // starts a server on the local development build.

Click on Import data to open the nuvo importer.

Select the CSV file previously created by navigating to the local CSV file location. The nuvo importer will automatically parse the imported CSV data in its user-friendly interface. Its algorithm powered by Contextual AI will automatically select the header and match the columns according to the provided TDM.
nuvo Importer can also scan your data for common validation issues. Review the entries and fix any errors in the row. Then click Complete Import.
Your data will be imported into the database.
In this guide, you’ve discovered a more efficient way to import CSV files into MySQL using nuvo Data Importer SDK. nuvo takes care of the data import workflow from start to finish, simplifying imports and reducing the risk of errors.
Powered by AI and an intuitive setup, nuvo handles data mapping, validation, enrichment, and cleaning, so you can focus on what matters most. If you're ready to see how nuvo can help you streamline data imports, book a call with our team, and we will happily support you every step of the way.


.png)
.png)


